Running Vitis AI with the Kria Starter Kit
Environment setup 2 (Vitis-AI installation, environment setup)
Release date: January 5, 2023
In this article, we will prepare the Vitis-AI development environment and Jupyter Notebook, and then check access from the host PC to Jupyter Notebook on the KV260.
Table Of Contents
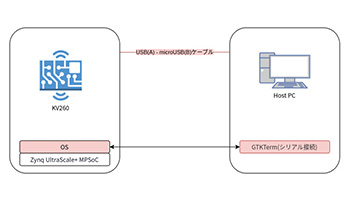
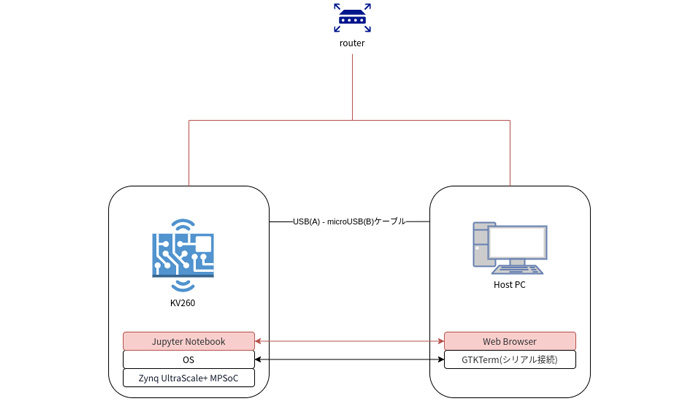
Configuration Diagram
The configuration diagram is as follows. The colored areas are the corresponding parts of this article.
Docker Installation
The Vitis-AI development environment is provided in Docker. Refer to How To Install to install Docker on the host PC.
Vitis-Ai Installation
On the host PC, retrieve the source from Vitis-AI
At the time of writing, there is no ver2.5 branch, so master will be used.
user@hostpc:~$ git clone --recurse-submodules https://github.com/Xilinx/Vitis-AIVitis-AI is available in cpu and gpu versions. In this article, we will use the cpu version and obtain a Docker image of the cpu version.
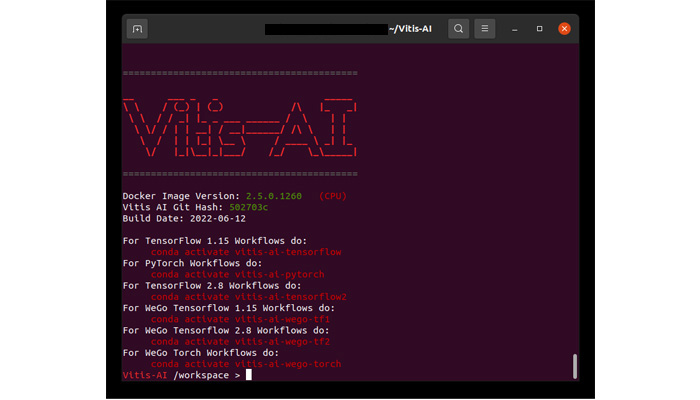
user@hostpc:~$ docker pull xilinx/vitis-ai-cpu:latestA startup script is provided in the source code to start the Vitis-AI development environment as below.
user@hostpc:~$ cd Vitis-AI (move to where you clone git)
user@hostpc:~$ ./docker_run.sh xilinx/vitis-ai-cpu:latest
The key input will be prompted during startup, so follow the prompts. Below screen is the sign of success. After confirming the startup, exit the Vitis-AI development environment with "exit".
From now on, if you need to work on the Vitis-AI development environment, run the above script.
Jupyter Notebook Configuration
Jupyter Notebook is an environment that allows interactive execution of programs such as Python via a browser.
This is useful because it allows the host PC to write and run programs on the KV260, but note that the KV260 and host PC must be connected to the same network.
KV260 Preparation
The image prepared in section 3.1 of Environment Construction 1 already contains the Jupyter Notebook environment, so installation is not required.
Configure the KV260 so that it can be accessed by the host PC. Then start KV260 and serially connect it. Once the startup is complete, use the following command to generate a configuration file.
user@kv260:~$ jupyter notebook --generate-config~/.jupyter/jupyter_notebook_config.py configuration file is generated. The following ip settings can be added to the file to make it accessible from the host PC.
c.NotebookApp.ip = '0.0.0.0'The following command will be appended.
* You may use a text editor or other means to append it.
user@kv260:~$ search_str="# c.NotebookApp.ip = 'localhost'"
user@kv260:~$ set_str="c.NotebookApp.ip = '0.0.0.0'"
user@kv260:~$ sed -i -e "/^$search_str$/a $set_str" ~/.jupyter/jupyter_notebook_config.py
Since it is used for access from the host PC side, memorize the IP address. Once you have the IP address, start Jupyter Notebook.
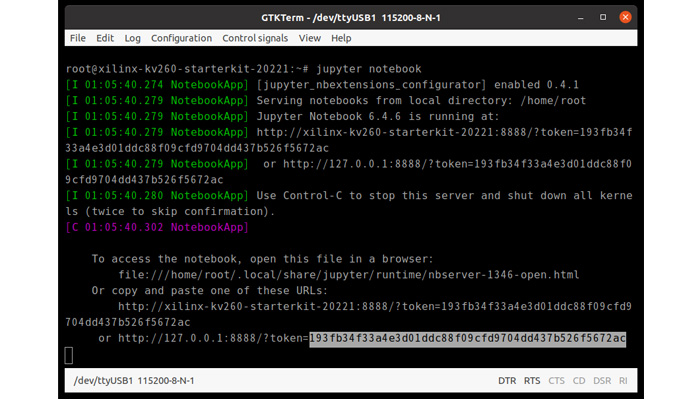
user@kv260:~$ jupyter notebookFor the first time only, also memorize the TOKEN in the following line.
* Note that the value of TOKEN itself is different from the following
At this point.
- IP address of KV260
- token
should have been noted. The ip setting is still in effect at the next startup, so there is no need to reconfigure it at each startup.
Host Pc Preparation
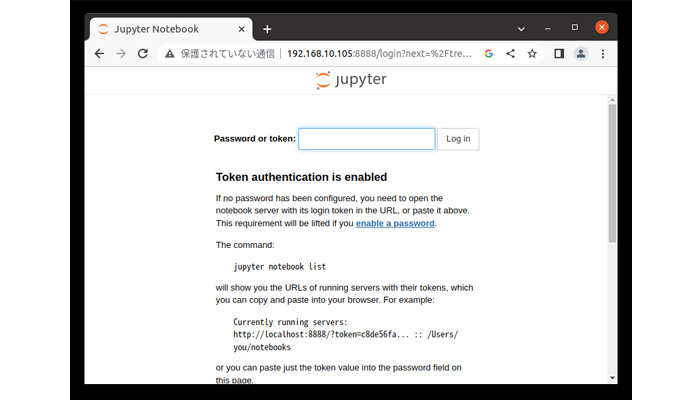
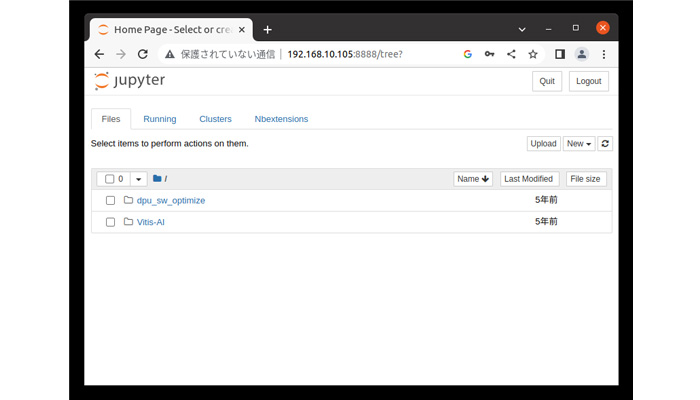
From browser, access to the http://[Kv260'S IP address]:8888
If you cannot access the site successfully, try restarting KV260. For the first time, enter the token at the top of the screen below. It will no longer be necessary, but please enter it again when requested.
After inputting the information, if the following message is displayed, it is OK.
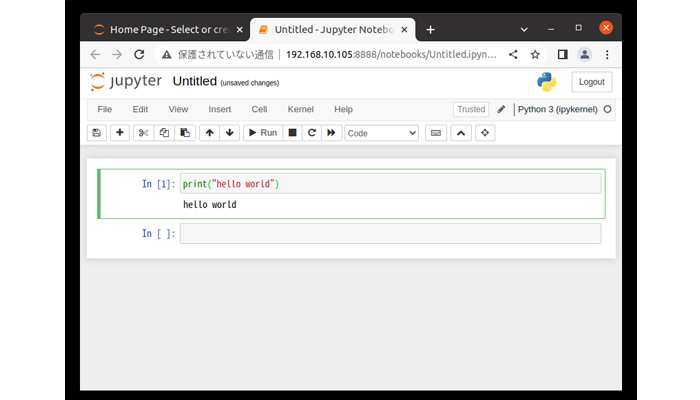
Let's create a notebook to try it out. Select "Python 3(ipykernel)" from the new menu on the right side of the above screen, write the code to print the string "hello world", and execute "Run" with selecting the cell you wrote. If the below screen is displayed, then it means your code was executed on KV260.
Summary
Vitis-AI development environment and Jupyter Notebook were prepared.
It would be useful to be able to access Jupyter Notebook on the KV260 from the host PC, as it would make it easier to modify code on the KV260 and see how it works.
*All names, company names, product names, etc. mentioned herein are trademarks or registered trademarks of their respective companies.