Running Petalinux
Starting Petalinux
Release date: Feb 22, 2023
In the previous article we built Petalinux for Zybo Z7-20. In this article, we will actually run Petalinux on the Zybo Z7-20.
Table of Contents
Petalinux Image Creation
First, package the Petalinux artifacts for Zybo Z7-20 built in the previous article and create a Petalinux Image.
// Go to the Petalinux project directory
$ cd ~/workspace/petalinux1/peta_project

// Create Image
$ petalinux-package --boot --force --fsbl images/linux/zynq_fsbl.elf --fpga images/linux/system.bit --u-boot
[INFO] Sourcing buildtools
INFO: Getting system flash information...
INFO: File in BOOT BIN: "/home/username/workspace/petalinux1/peta_project/images/linux/zynq_fsbl.elf"
INFO: File in BOOT BIN: "/home/username/workspace/petalinux1/peta_project/images/linux/system.bit"
INFO: File in BOOT BIN: "/home/username/workspace/petalinux1/peta_project/images/linux/u-boot.elf"
INFO: File in BOOT BIN: "/home/username/workspace/petalinux1/peta_project/images/linux/system.dtb"
INFO: Generating zynq binary package BOOT.BIN...


****** Xilinx Bootgen v2022.1
  **** Build date : Mar 30 2022-09:29:13
    ** Copyright 1986-2022 Xilinx, Inc. All Rights Reserved.

[WARNING]: Partition zynq_fsbl.elf.0 range is overlapped with partition system.bit.0 memory range
[WARNING]: Partition system.bit.0 range is overlapped with partition system.dtb.0 memory range

[INFO]   : Bootimage generated successfully

INFO: Binary is ready.
WARNING: Unable to access the TFTPBOOT folder /tftpboot!!!
WARNING: Skip file copy to TFTPBOOT folder!!!
If the output shows " Bootimage generated successfully ", it is a success. BOOT.BIN is generated.
$ ls images/linux/
  BOOT.BIN     pxelinux.cfg           rootfs.jffs2     u-boot-dtb.bin  vmlinux
  boot.scr     rootfs.cpio            rootfs.manifest  u-boot-dtb.elf  zImage
  bootgen.bif  rootfs.cpio.gz         rootfs.tar.gz    u-boot.bin      zynq_fsbl.elf
  config       rootfs.cpio.gz.u-boot  system.bit       u-boot.elf
  image.ub     rootfs.ext4            system.dtb       uImage
Partitioning the microSD card
The created Image is to be written to a microSD card, but before that, partition it. The following is an example for a 4GB microSD.
| partition | size | File sysytem |
|---|---|---|
| BOOT | 200MB | FAT32 |
| ROOT | Remaining (3.8GB) | ext4 |
Create partitions with fdisk.
// locate the SD card (assume it was sdb)
$ lsblk

$ sudo fdisk /dev/sdb

Welcome to fdisk (util-linux 2.34).
Changes will remain in memory only, until you decide to write them.
Be careful before using the write command.

// Delete (multiple) partitions that already exist
Command (m for help): d
Partition number (1,2, default 2): 1

Partition 1 has been deleted.

Command (m for help): d
Selected partition 2
Partition 2 has been deleted.

Command (m for help): d
No partition is defined yet!

// Create the first partition (BOOT)
Command (m for help): n
Partition type
    p   primary (0 primary, 0 extended, 4 free)
    e   extended (container for logical partitions)
Select (default p): p
Partition number (1-4, default 1): 1
First sector (2048-60506111, default 2048): 2048
Last sector, +/-sectors or +/-size{K,M,G,T,P} (2048-60506111, default 60506111): 411648

Created a new partition 1 of type 'Linux' and of size 200 MiB.

Command (m for help): a
Selected partition 1
The bootable flag on partition 1 is enabled now.

// create a second partition (ROOT) (all defaults)
Command (m for help): n
Partition type
    p   primary (1 primary, 0 extended, 3 free)
    e   extended (container for logical partitions)
Select (default p):

Using default response p.
Partition number (2-4, default 2):
First sector (411649-60506111, default 413696):
Last sector, +/-sectors or +/-size{K,M,G,T,P} (413696-60506111, default 60506111):

Created a new partition 2 of type 'Linux' and of size 28.7 GiB.

// save and exit fdisk
Command (m for help): w
The partition table has been altered.
Calling ioctl() to re-read partition table.
Syncing disks.
Two partitions have now been created. Suppose the paths of the partitions are sdb1 and sdb2. Set up the file system for each partition with mkfs.
// Set the file system of the first partition to FAT32
$ sudo mkfs.vfat /dev/sdb1
mkfs.fat 4.1 (2017-01-24)

// Set the file system of the second partition to ext4
$ sudo mkfs.ext4 /dev/sdb2
mke2fs 1.45.5 (07-Jan-2020)
Discarding device blocks: done
Creating filesystem with 7511552 4k blocks and 1880480 inodes
Filesystem UUID: f0b56b0e-f678-4408-98c7-d5825cb06c81
Superblock backups stored on blocks:
  32768, 98304, 163840, 229376, 294912, 819200, 884736, 1605632, 2654208, 4096000

Allocating group tables: done
Writing inode tables: done
Creating journal (32768 blocks): done
Writing superblocks and filesystem accounting information: done
Writing a Petalinux Image to a microSD card
Now, mount the microSD card and write the Petalinux Image to the BOOT, ROOT partition.
// Mount the microSD card (mounting should be done according to each environment)
$ sudo mkdir /media/username/BOOT
$ sudo mount /dev/sdb1 /media/username/BOOT
$ sudo mkdir /media/username/ROOT
$ sudo mount /dev/sdb2 /media/username/ROOT

$ cd images/linux/

// Copy BOOT.BIN, boot.scr, image.ub to the BOOT partition
$ sudo cp BOOT.BIN boot.scr image.ub /media/username/BOOT/

// Write rootfs.tar.gz to the ROOT partition
$ sudo tar xf rootfs.tar.gz -C /media/username/ROOT/

$ sync
The microSD card is ready.
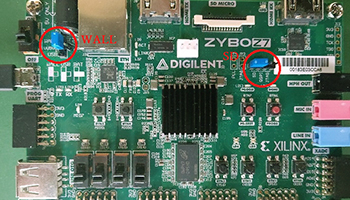
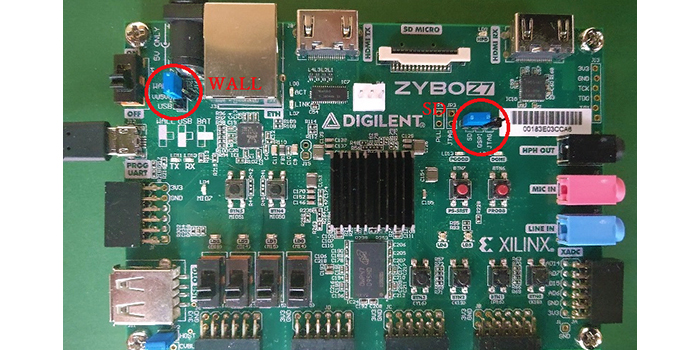
Jumper pin settings for Zybo Z7-20
This time, JP5 should be set to the SD side because execution will be done from the SD card, not JTAG.
When the Zybo Z7-20 is connected to a PC, it is powered by the PC, but if the Zybo Z7-20 is running Linux or other complex processes, the current consumption will increase and the Zybo Z7-20 may not boot properly due to insufficient supply.
Therefore, it is recommended to switch to power supply from the AC adapter. Set JP6 to WALL side.
The respective pin settings are shown in the figure below.
Booting Linux
Now it is time to start Petalinux on the Zybo Z7-20.
- Install the microSD card into the Zybo Z7-20
- Connect Zybo Z7-20 to PC (Ubuntu) with micro USB to USB cable
- Power Supply the Zybo Z7-20
- Run dmesg | tail -f to check the Port to connect
- Running serial terminal software on Ubuntu
The serial terminal settings are as follows
| items | parameter |
|---|---|
| Baud Rate | 115200 |
| Parity | none |
| Bits | 8 |
| Stopbits | 1 |
| Flow control | none |
| Port | Connections confirmed by dmesg |
After successfully booting Linux on Zybo and connecting from the serial terminal, you will see the boot log on the serial terminal and be prompted to log in as shown below.
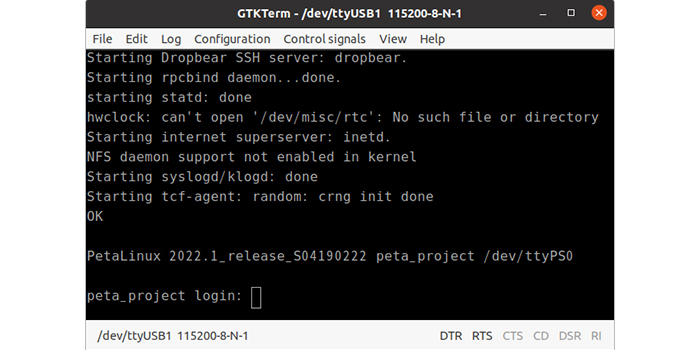
The login name is petalinux. The first time, you will be asked to set a password.
peta_project login: petalinux
You are required to change your password immediately (administrator enforced).
New password:
Retype new password:
peta_project:~$ pwd
/home/petalinux
peta_project:~$ uname -a
Linux peta_project 5.15.19-xilinx-v2022.1 #1 SMP PREEMPT Mon Apr 11 17:52:14 UTC 2022 armv7l GNU/Linux
Now you can start Petalinux and log in.
* All names, company names, product names, etc. mentioned herein are trademarks or registered trademarks of their respective companies.